Show Printable Area Excel
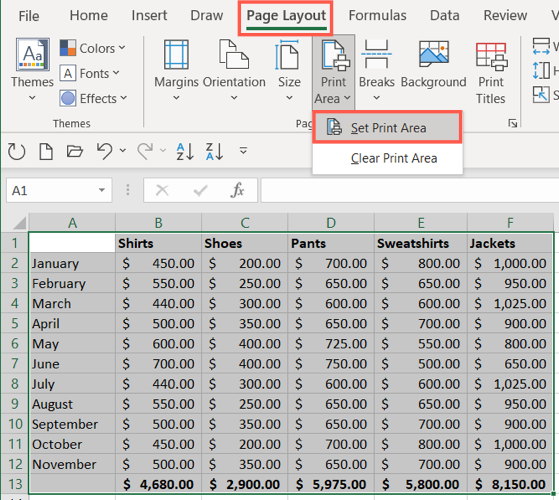
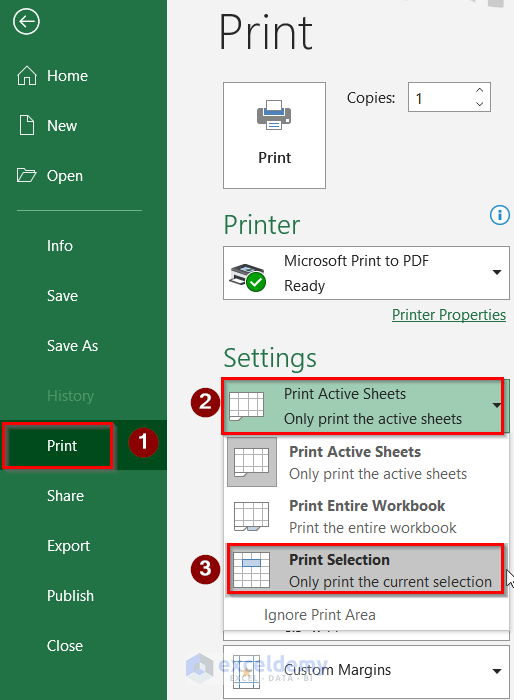
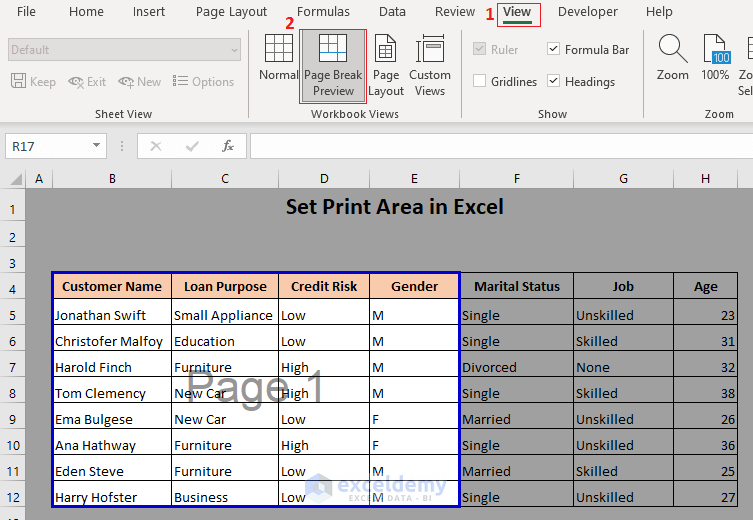
Show Printable Area Excel - So far, you’ve learned how to view the print area in excel in six intuitive methods, like the print preview tool, the page layout view, the page break preview, named ranges, go to dialog, and excel vba. Your print area is selected. Preview of the print area To view the print area, go to the view tab and select page break preview. Highlight a cell range you want to print exclusively on the paper sheet. Go to the view tab> then page break preview and your sheet will show the print area. Set print area in excel using print area command. Once set, a faint gray line appears around that cell range. Go to print layout > print area and select set print area. In the page setup group, click the print area button. Highlight a cell range you want to print exclusively on the paper sheet. The print area that you set is saved when you save the workbook. In this article, i will intrude several methods to only show print area in a worksheet in excel. The spreadsheet will be shown in page break view. You can see the set print area on your screen enclosed in a blue border. Once set, a faint gray line appears around that cell range. In the page setup group, click the print area button. In the ribbon, go to view > worksheet views > page break preview. Select the area you want to print> go to the page layout tab> click print areas > select set print area. The print area button in the page setup block of the page layout tab is the default tool for setting a print area in excel. In the page setup group, click the print area button. The spreadsheet will be shown in page break view. Go to print layout > print area and select set print area. Highlight a cell range you want to print exclusively on the paper sheet. On the page layout tab, in the page setup group, click print area, and then click. Set print area in excel using print area command. Only show print area in page break preview view in excel; 4 easy methods to show print area in excel. Click set print area from the options. Now, press alt + p + r + s to create the print area. Only show print area with vba in excel; This tutorial demonstrates how to show the print area in excel and google sheets. The print area that you set is saved when you save the workbook. Highlight a cell range you want to print exclusively on the paper sheet. Set print area in excel using print area command. This tutorial demonstrates how to show the print area in excel and google sheets. To see all the print areas to make sure they’re the ones you want, click view. Go to the view tab> then page break preview and your sheet will show the print area. You can see the set print area on your screen enclosed in a. Select the area you want to print> go to the page layout tab> click print areas > select set print area. Now, press alt + p + r + s to create the print area. The print area that you set is saved when you save the workbook. The spreadsheet will be shown in page break view. Your print area. The cells that are set as the print area are marked as page 1. Preview of the print area On the page layout tab, in the page setup group, click print area, and then click set print area. 4 easy methods to show print area in excel. Only show print area with kutools for excel’s set scroll area utility In this article, i will intrude several methods to only show print area in a worksheet in excel. To set a single print area in excel, you can use the set print area command, page setup dialog box, page break preview feature, print selection setting, and excel vba code, as described in this section. To view the print area, go. To view the print area, go to the view tab and select page break preview. Go to the view tab> then page break preview and your sheet will show the print area. Only show print area in page break preview view in excel; 4 easy methods to show print area in excel. You can see the set print area on. In this article, i will intrude several methods to only show print area in a worksheet in excel. The print area that you set is saved when you save the workbook. Preview of the print area This tutorial demonstrates how to show the print area in excel and google sheets. Go to the view tab> then page break preview and. Download the workbook, modify data, and find new results with formulas. Select the area you want to print> go to the page layout tab> click print areas > select set print area. The print area button in the page setup block of the page layout tab is the default tool for setting a print area in excel. Set print area. So far, you’ve learned how to view the print area in excel in six intuitive methods, like the print preview tool, the page layout view, the page break preview, named ranges, go to dialog, and excel vba. Highlight a cell range you want to print exclusively on the paper sheet. In this article, i will intrude several methods to only show print area in a worksheet in excel. Go to print layout > print area and select set print area. Click set print area from the options. The print area that you set is saved when you save the workbook. To set a single print area in excel, you can use the set print area command, page setup dialog box, page break preview feature, print selection setting, and excel vba code, as described in this section. You’ve already defined or set a print area in your sheet. Go to the page layout tab> click the page setup window. In this tutorial, i will show you several ways to set single and multiple print areas in excel and how to modify and clear them. Go to the view tab> then page break preview and your sheet will show the print area. On the page layout tab, in the page setup group, click print area, and then click set print area. Select the area you want to print> go to the page layout tab> click print areas > select set print area. In the page setup group, click the print area button. To view the print area, go to the view tab and select page break preview. Now, press alt + p + r + s to create the print area.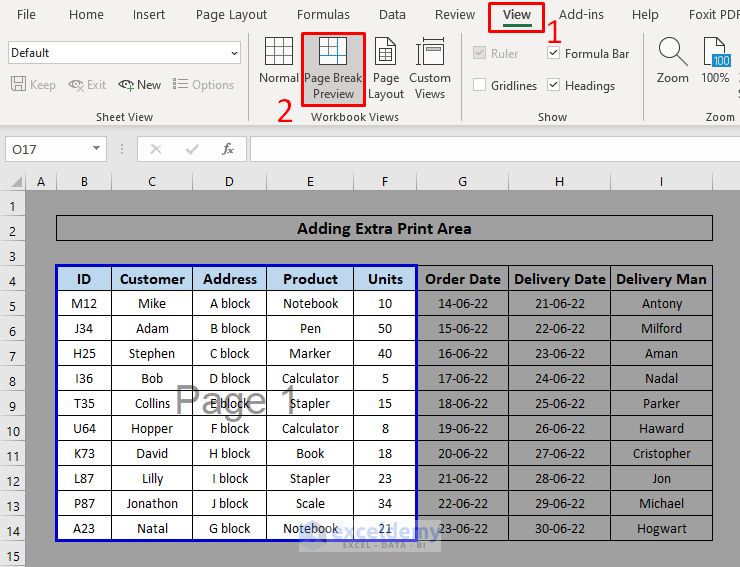
How to Set Print Area with Blue Line in Excel 5 Easy Ways
Select Printable Area Excel
:max_bytes(150000):strip_icc()/ExcelClearPrintArea-5c1c287ac9e77c000159666f.jpg)
How To Show Printable Area In Excel
:max_bytes(150000):strip_icc()/ExcelPageBreakPreview-5c1c28c8c9e77c00017a2ade.jpg)
How To Show Printable Area In Excel
How To Show Printable Area In Excel NBKomputer

How to Show Print Area in Excel (4 Easy Methods) ExcelDemy
How to Show Print Area in Excel 4 Easy Methods ExcelDemy

How to Set Print Areas in Excel A StepbyStep Guide

How to Show Print Area in Excel (4 Easy Methods) ExcelDemy
How to Set Print Area in Excel (5 Methods) ExcelDemy
You Can See The Set Print Area On Your Screen Enclosed In A Blue Border.
Preview Of The Print Area
To See All The Print Areas To Make Sure They’re The Ones You Want, Click View.
Only Show Print Area With Kutools For Excel’s Set Scroll Area Utility
Related Post: